In the deep web, there are many hacker courses to learn. There are programming courses, security courses, hacking courses, and more. And then, there are the courses that teach you how to become a hacker. These are the courses that have had thousands of students all over the world. The best thing about these courses? They are very cheap, to the point where you can buy one that is super cheap for under $10. Instead of getting stuck in the land of expensive courses, try out the ones that teach you how to hack.
A Guide to Deepfake Videos and Important Steps to Identify Them
Today, various activities have been performed on the computer. From accounting tasks to film editing, the computer is essential for various activities. For the filmmaking industry, computer-based cinematography and editing have become common things. You will find that many films are made on the sets designed on the computer. Through 3D modeling, animated characters can also be created for movies.
In many cases, animated characters in a film look completely real. With the advent of time, computer graphics will become an integral part of the film industry. In such a scenario, Deepfake technology has gained relevance. In the following section, you will find a guide to Deepfake help.
Deepfake Help – A Guide to the Technology
So, what is Deepfake technology? Before reading Deepfake tutorial, you should have a basic understanding of the technology. The term “Deepfake” has come from deep learning. If you have a little knowledge of Artificial Intelligence (AI), you must be familiar with the term deep learning.
A deep learning algorithm has been used for resolving problems with a given set of data. The algorithm gives power to the computer to make decisions. In the initial days, such technology used to be applied to digital content and videos to create fake media that looks realistic.
So, how can one create the Deepfake? There is no fixed method of creating the Deepfake, as different people may adopt different techniques to create them. In most cases, face-swapping techniques have been deployed for creating Deepfake.
Sometimes, two videos are merged to create a video. For example, you may take a video of a movie in the background. In the foreground, you can another clip. Video editors use such a technique to create Deepfake. You can also find many video editing tools that give you the option to create Deepfake instantly.
History and Origin of Deepfake
If you want to learn how to do Deepfake, you should know the history and origin of the concept. According to the technology experts, deep faking came into being in 2012. Today, you can find various social media memes that feature Deepfake videos.
Such videos on various famous personalities have become viral. Many people may have seen the video of Mark Zuckerberg with dubbed voice taunting Facebook. Another video of Nancy Pelosi has also become viral. In the video, her voice was slowed down to make her sound drunk.
Deepfake videos bring great fun, though there are some serious concerns too. Many people know how to create a Deepfake. Many people make wrong use of the technology, and that causes serious troubles. A mischievous person can create such videos to defame others. Many people are not aware of Deepfake technology, and thus they may consider such videos real.
So, it can become easy to show a person in a bad light through Deepfake technology. For this reason, many video editors and technology experts have criticized the idea of Deepfake. During the 2020 election in the USA, Deepfake became a serious concern for the political parties. People can get easily misled with such videos.
Protocols for Deepfake
Today, everyone knows how to make a Deepfake on iPhone. Hence, setting up a security protocol is important to deal with the Deepfake. Instead of monitoring and stopping individuals from creating Deepfake, it is easier to bring all the devices and tools under certain protocols to eliminate the threats of Deepfake. Since social media is the major platform for spreading Deepfake videos, various social media platforms are exploring options to block such videos.
Facebook, Twitter, LinkedIn, and other social media platforms have changed their algorithms to identify the Deepfake videos. Through fingerprints and embedding digital watermarks, Deepfake can get identified. Reading the metadata can also help to identify the Deepfake.
However, users can bypass such security barriers and post Deepfake on social media. There are a lot of discussions going on setting up protocols for blocking Deepfake. However, there is no protocol yet to stop them.
Steps to Identify Deepfake
So, how long does it take to make a Deepfake? How can you identify a Deepfake video? Getting the answer to these questions is important for better knowledge of Deepfake technology. For creating Deepfake videos, people use photo and video editing tools.
For example, Snapchat had launched such a video editor. You can create funny Deepfake videos with Snapchat. Due to the fear of potential misuse of the technology, Snapchat rolled the feature back. Today, you will find many photos or video editing tools that come with Deepfake technology. In most cases, it becomes tough to identify Deepfake videos. In the following section, you can find a guide to recognize Deepfake.
1. Difference in Video Resolution
Source videos for Deepfake will come with higher resolution than the destination videos. For this reason, you may find strange differences in the resolutions of objects present in the video. The foreground may look low-quality video. At the same time, the resolution of the background will appear excellent. Such differences suggest that two videos have been merged to create a Deepfake video.
If you go through Deepfake tutorial python, you will understand such problems with Deepfake technology. However, many applications or software are working on making the technology flawless. Soon, you will come across Deepfake videos that do not have such resolution issues. If you check the viral video of Jennifer Lawrence closely, you will note the fuzziness of the background. You can read the Deepfake meme tutorial, and most tutorials mention the resolution issue.
2. Slow Run a Video and Watch the Face
Do many people ask how to use Deepfake? In social media, such fake videos are used for creating interesting memes. Sometimes, it becomes difficult to understand the differences between a fake video and an original video.
If you undergo a Deepfake audio tutorial, you will realize that there are a few techniques to find Deepfake videos. For identifying such videos, you need to run the video slow on a video editor tool. While you run the video close, you should closely note the facial expression of the person in the video. Even though technology has made terrific advancements, you can easily notice some inconsistencies.
3. Scaled Face
A video that shows a person in multiple camera angles is not suitable for Deepfake. If you want Deepfake help, you should keep this tip in mind. From here, you will also find the cue of identifying Deepfake videos.
When there are multiple camera angles, face scaling will not be perfect for all frames. As a result, you can easily spot a Deepfake video. If you check Sylvester Stallone’s Deepfake in Terminator 2, you will realize that face scaling has happened inconsistently.
4. Search for the Inconsistent Borders
If you check Deepfake tutorial 2020, you will realize that many tutorials talk about inconsistent borders. If you zoom in on a video and check eyebrows, chins, facial hair, cheekbones, and other borderlines, you will realize the disparity. In the Deepfake tutorial Mac, you will find the methods for removing such inconsistency with the borderlines.
5. Inconsistent Skin Tones
In the Deepfake voice tutorial, many tutors mention the inconsistent skin tone feature. People check the skin tone of the person in the video for identifying Deepfake. Technology has progressed a lot.
Many video editing tools offer the flawless creation of Deepfake videos. But, the tools also accept some technological flaws. Inconsistent skin tone is such a problem. You can easily spot the problem if you minutely check a Deepfake video.
Uses of Deepfake
There is not everything bad about Deepfake videos. Such videos can entertain and amuse you. However, the problem is the bad intention of creating Deepfake. Many people create such videos to malign others.
Thus, Deepfake has become a matter of concern for everyone nowadays. From politicians to notable celebrities, everyone fears misleading campaigns with Deepfake from the rivals. The negative sides of technology have been discussed already. In the following section, the positive sides are discussed.
1. Deepfake for Film Industry
If you go through the Deepfake face swap tutorial, you will know that face-swapping technology has been adopted by many Hollywood films. For performing many stunts, face-swapping technology has been used.
Professional stuntmen perform the stunts, while the videos are filmed. Later, the video editor performs face-swapping to replace the face of the stuntman with the face of the actor. The cost of filmmaking can be reduced significantly with such technology.
2. Dubbing
Deepfake ensures that audios dubbed in many languages do not need separate video shooting. Using a Deepfake software tutorial, a person can be used for multiple audios. For example, a video of David Beckham on malaria awareness has recently become viral.
The original video was shot in English. For spreading awareness in different countries, dubbing happened in different languages. But, Beckham did not need to learn different languages. With Deepfake, his facial expressions were matched with the audios.
3. Education Applications
Various educational applications are emerging these days. Such applications feature videos where teachers provide a demonstration of the various lessons. With Deepfake, such videos can be created within a few hours. Keeping the teacher in the foreground, you can change the background to make it attractive for the students.
Conclusion
Deepfake have some good and bad things. It is worth learning the technology for editing videos. How do I make a Deepfake? For creating such videos, you need to check the Deepfake tutorial Android.
Deepfake Tutorial
I’m going to show you how to create fake videos in just a few hours easily. We will be using Deepfacelabab 2.0, build 7_18_2020, and the included video clips for this tutorial. You will need access to a Windows P.C. with an Nvidia graphics card. We will be using Deep Face Labs Quick96 preset Trainer with default settings by pressing enter or return when asked for input.
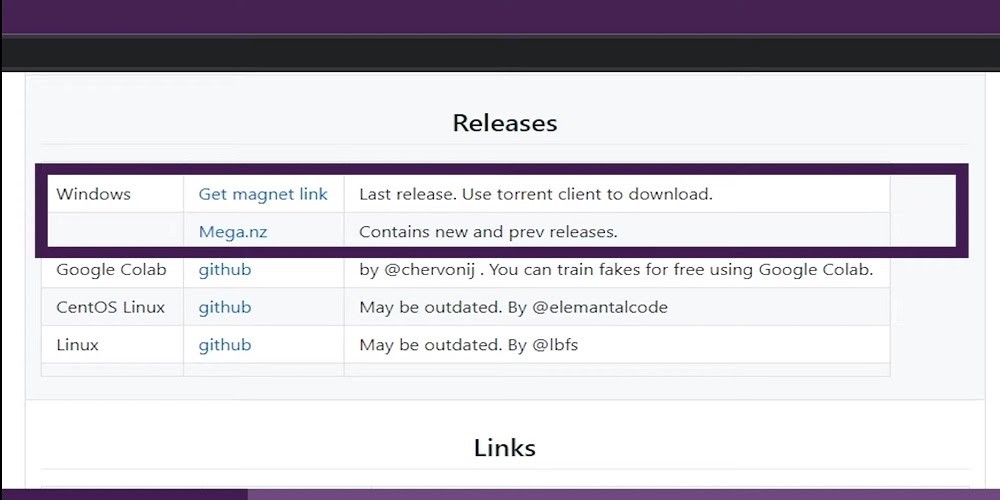
Step one: Download and install
Visit github.com/iperov/DeepFaceLab, scroll down to the section labeled releases, you can select the Torrent Magnet Link or download from mega.nz (see below)
Once your download is complete, you can double click on the .exe file or use your favorite ZIP program to extract it. There is no setup for Deep Face Lab. Once the files are extracted, the installation is complete. Open the folder labeled Deep Face Lab Nvidia. Here you will see a couple of folders and several batch files used in the deep fake process. For this tutorial, we will only be using nine of these files. First, let’s have a look at the workspace folder. You will see three more folders in this directory that will hold our images and trained model files. The two video files include Data_src, our source video, and Data_dst, our destination video. Click back to the main folder, and we’ll get started with the Deep Fake.
Step two: Extract Images
Double click on the file labeled 2) extract images from video data_src and press enter a few times to use the default values. The video file will be processed, and a .png file for each frame will be created. Press any key or close the window. Do the same for data_dst using the file labeled 3) extract images from video data_dst full F.P.S., with default values.
Step three: Extract Facesets
Now we’ll process the images and extract the faces to be used in our deep fake; double click the file 4) Data SIRC Forsett to extract and use the default values. After a few minutes, the extraction will complete and give you a report on the number of images found in faces detected. Do the same for data_dst using the file 5) data_dst face set extract.
Step four: View Facesets
After extraction, we can view the source, and destination face sets using the files labeled 4.1) data_src view aligned result and 5.1) data_dst view aligned results. Here we can remove unwanted faces from the project, but we will be using all the images for now. You can exit the image viewer.
Step five: Training
It is now time to begin training our deep fake model; double click the file labeled 6) Train Quick96. Again we will use the default settings. The software will load all our image files and attempt to run the first iteration of our training. If it is successful, then the training preview window will open. If the trainer fails to run, then you will need to try C.P.U. Only training, which is not covered in this video. Let’s take a moment to look at the preview window.

At the top, we have some keyboard commands below that, a graph indicating the accuracy of our training, and a preview of our model images. Press the P key to update the preview window and notice the graph and images change. These lines represent loss values that will approach zero over time. So the lower the line, the better the results will be. You can see these same values represented as numbers in the command window. The image preview has several columns showing our source and destination images being processed. In the last column, we can see the current progress of our deep fake face set. Use this preview window to decide when you want to end the training. Press the enter key to save the model and exit. You can save and restart the training at any time.
Step 6: Merging
Now that our training is complete, we can merge the faces and create our final deep fake video. Start by running 7)merge quick96 and press enter a few times to load the default settings in the merger window; you will see a map of keyboard commands.
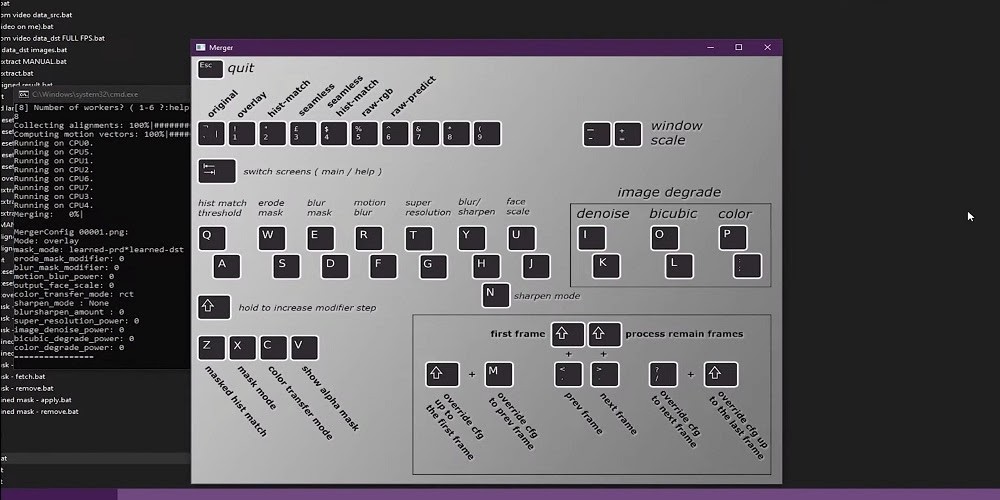
For this tutorial, we will only be using a few of these commands. Press the tab key to switch between the keyboard map and the preview window. If you see a black preview, use the period or greater than the key to advance to the first frame. You will notice the current frame number and settings displayed in the command window. Use the W and S keys to change the road mask value to 20. Noticing how the border around the face contracts. Next, use the E and D keys to raise the blur mask value to 100. Now we apply these settings to the rest of our frames by pressing the shift and keys simultaneously.
Finally, we process the remaining frames by pressing the shift in greater than keys. Once the merger reaches 100 percent, we can close both windows. The last part of this process is to merge our new deep fake frames into a video file with our destination audio. Double click the file, labeled 8) merged to mp4 and press enter to begin processing. Close the window when merging is done. Finally, we are ready to view our deep fake video. Navigate to the workspace folder, and you will see a couple of new files play the file labeled results.mp4. You will see the deep fake video you have made.
Remember, you can restart the training at any time to improve the quality of your deep fake. Feel free to experiment with the merger settings to get your desired results. You can also create a deep fake from your videos following this same tutorial by renaming them and replacing the files and data underscore src mp4 and data underscore dst mp4.