If you’ve been struggling with your assignments in an Excel class, you’re not alone. Excel is a software program that allows you to manipulate numbers to perform calculations and present your data in graphs and charts.
Because it’s so versatile and includes so many advanced functions, it can sometimes be difficult to learn. However, once you master it, you’ll find it to be a powerful tool that makes your work quicker, easier, and more accurate.
You are welcome to submit your Excel task and our experts will start right away!
Alternatively, use this handy step-by-step guide to help you with your Excel assignments.
College life isn’t not about hitting the books or learning lessons by rote. No matter what your college major is, whether you’re getting ready for STEM or humanitarian professionals, proper education can prepare students for life and the future career.
This means your professors assign tasks that can help you obtain knowledge and improve both hard and soft skills. As a result, many professors give their students excel spreadsheet assignments as modern people often work online and their job roles are connected to Microsoft Excel or Microsoft Access.
As a result, knowing all the functionality of Microsoft Excel and having an ability to implement these theoretical concepts in practice is a great help for students of all faculties and ages even if you work on a SPSS assignment or plan to be an HR manager.
However, not all students know how to make the most out of this spreadsheet application, so even A+ students need excel assignment help from time to time.
About Microsoft Excel in Short
Microsoft Excel is a spreadsheet application developed by Microsoft in 1987. In the last 30 years, the application has been used for Windows, macOS, Android, and iOS. Excel has a great variety of basic features like the usage of a grid of cells arranged in numbered rows and letter-named columns as well as arithmetic operations. However, the app also has advanced features like graphing tools, pivot tables, and its macro programming language called Visual Basic for Applications (VBA).
Since Microsoft Excel allows users to organize and manage data, its functionality has an ability to answer statistical, educational, or financial tasks. Plus, it can show data via charts, line graphs, histograms, etc.
As you can see, the application has a great number of functions, so it can be daunting for non-experienced students to deal with Microsoft Excel assignments and therefore they start looking for an excel tutor who can help them understand all functions and their usage in practice.
Why Do Students Seek Out Excel Assignment Help Online?
Needless to say, most students want to delegate their homework assignment tasks to professionals to save time, avoid stress situations, and understand the subject better.
Practically every student wants to spend less time on homework assignments and deliver high-quality papers to their professors at the same time. But when students need help with excel, most of them face at least one of the following problems:
- Misunderstand the functionality and capability of MS Excel: It’s said that humans use 10% of their brains’ capability. The same happens with people who use Excel as the spreadsheet application is not just about a grid of cells and letter-numbering columns. When students don’t know what functions they can use or how to do it the right way, it’s daunting for them to cope with their homework assignments, so it causes stress and anxiety.
- Don’t know how to create the right formulas and make them work the right way: MS Excel has different formulas and built-in functions that help users do calculations and solve problems. However, knowing all functionality doesn’t mean knowing how to make the most out of these formulas and make them work for you. Once you face a problem with a formula, most users want to ask experts for help and students do it, too.
- Lack of shortcut keys knowledge: When it comes to working in MS excel, most users rely on a touchscreen or a mouse to create and manage spreadsheets. However, advanced users know that knowing shortcut keys gives an opportunity to work more efficiently. Since most students are pressed for time, a lack of shortcut keys knowledge turns them off working on homework Excel assignments.
No matter what is the primary reason for seeking excel assignment help online, it’s more likely that you’ve already typed ‘do my excel homework’ in Google search and now you simply don’t know what excel assignment service to choose.
Here at AssignU, we put our customers first. If you want to become the next satisfied customer, fill out a simple order form and let us complete your excel homework for you.
Still, doubting? Check out the top reasons why our company is the best choice for students who need to get excel assignment help.
Why Ask Assign U to Complete Your Excel Homework Assignments?
Long story short: AssignU has a great team of excel experts who are ready to create Microsoft excel projects for college students, university scholars, or even PhD masters.
Our company is not just ‘another excel assignment service’ on the market that tries to attract new customers; we also put time and effort into customer satisfaction as we want to deliver high-quality services that make our clients happy and satisfied.
Here are several reasons why AssignU is a great choice to ask for excel assignment help:
- Choose the right Excel expert for your needs and wants from our team: When it comes to advanced Excel assignment help, completing your task isn’t enough. It’s also important to discuss all nuances with an Excel pro who can share his/her tips on using the functionality of this spreadsheet application. We have a great team of experienced writers which means every student can work with the professional who meets your expectations–just choose from bids.
- Save time and money on getting your assignments done: Our writers are experienced in meeting tough deadlines, so we can get your task done in 4 hours. What is more, we never charge extra fees and have hidden costs. Plus, our prices are affordable for all students which means you can get professional MS Excel help without spending much time or money.
- Make sure your task will be delivered on time or get compensation: As we’ve already said, we put our customers first. We know that some students need to get their task done even ‘yesterday’, so we are ready to meet your deadlines or send a compensation if your assignment isn’t delivered on time. Check out our ‘money-back policies’ to read more about this guarantee.
- Get 24/7 customer support via all popular channels: Do you have a question about your assignment? Do you want to discuss a specific issue with your writer? Or do you simply want to add some requirements to the order? Reach out to our customer service team and make sure you get your questions answered ASAP. We work 24/7 via email, phone, and live chat so you will never be alone with your problem, concern, or question.
- Enjoy lifetime bonuses and offers for our loyal customers: Wouldn’t it be amazing if you could spend less money when working with the same assignment service over and over again? We value our loyal customers, so we want to reward your loyalty with benefits and offers. Sign up for your account to start getting discounts, exclusive offers, and free services right now!
If you need help with Excel, don’t waste your time on finding an assignment service as you’ve come to the right place. Fill out the form, leave your details, and wait for a high-quality piece to be delivered in time. Get in touch with us to get your Excel assignment help.
Top Excel Tips by Assign U Experts
Tip 1 – Quick Analysis
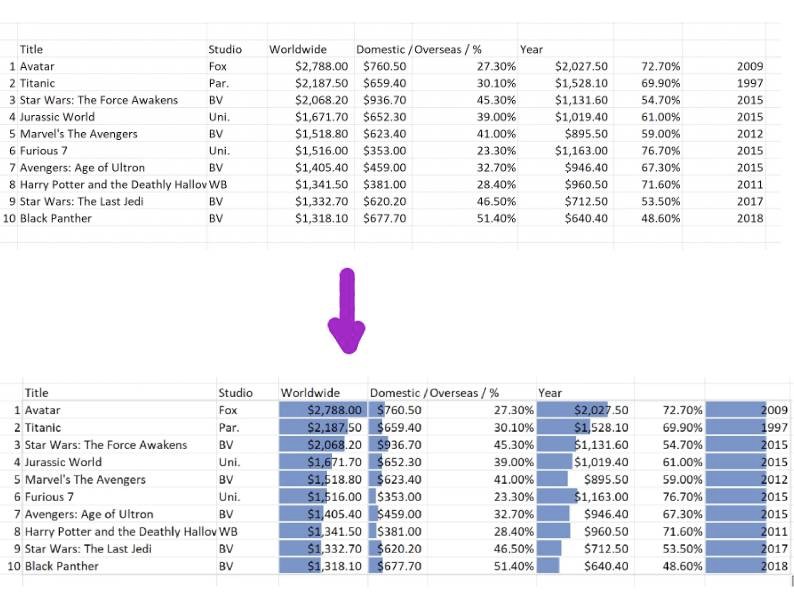
And type one is a quick analysis. So I already have a table here that I have of the top 10 grossing movies of all time. And I just want to do some quick analysis on it. If I click anywhere inside the table here, I’m just going to click up here in the first one. And then if I just go down and highlight, I’m just going to highlight here notice that I have this quick analysis icon that pops up.
So if I go ahead and click on it, you’ll see that you get all these different things that you can quickly apply to your table. So from formatting, you can see if I go across how I can quickly add some formatting. If I wanted to do some totals here. If I go to this part, you can see how I can click on totals. And if I wanted to go through different ones, how the totals just automatically pop up there. So very, very quick to do. The thing I like to is the charts. So if I go over to the charts and click on it here, you can see how I can just see these charts in a hurry.
And if I wanted to add them, I can click them, and boom, they’re right in my on my spreadsheet right away. So this is a great thing to speed up a lot of time. A lot of people don’t realize that little quick analysis is there. Just go ahead. When you have your table, click on it and see all the options that you have.
Tip 2 – Use filters
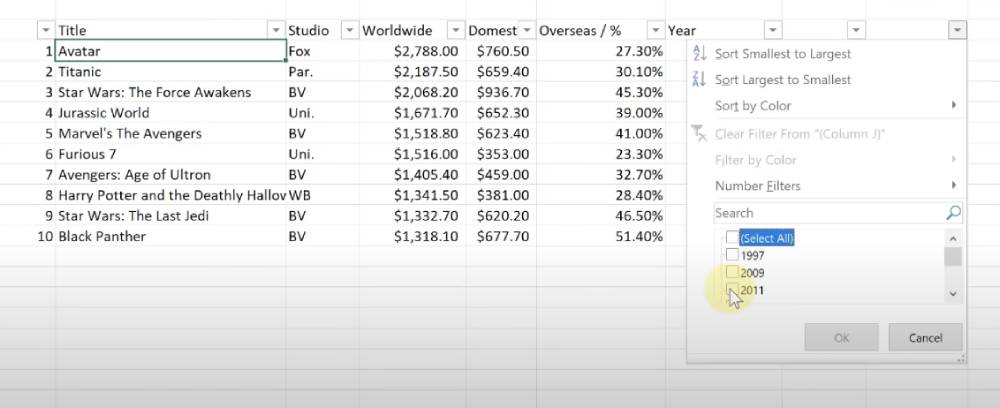
A great feature is the filter feature, so let’s see if you have a table with a lot of information in it and you just want to find something in a hurry to just take out other parts, try it. So in this case, I’m going to just click inside this short table that I have here to give you an example.
I’m going to click on Avatar. So I’m inside the table. I’m going to go up to data here, click on data. And now this is the filter, what I want. So if I’m going to click on it, I notice across the top here, little arrows, dropdowns. I have some choice. So what I like about this is, let’s say by year if I was going to look for something in a specific year and you could imagine if this is a really long list, if I click on this, I’m going to go down here to the bottom and I could do some searching here, but I’m just going to use the checkmarks here.
So I’m going to go select all and say I just want to find something in twenty eleven, click on it hit. OK, and it just shows me the movie that was in twenty eleven from the list that I have from the table so I can go back, select them all it ok in there all back again. So maybe I’m looking by studio. I could go back and click on click them and I want to see everything from Paramount. It ok and there I go. So I love this feature of just sorting through tables, especially if they’re long. Take a look at some of the other options under the filter you can do because you can see how you can sort by largest to smallest and go ahead and try different ones or no filters.
If you had some greater than between, you can see averages and different things like that. So this can save you a lot of time just by clicking on inside the table, going to data and hitting that feature.
Tip 3 Use Command + Arrow to reach the end quickly
Here’s a really quick tip for you. And it’s just about how to move around on your worksheet. So if I’m inside this table here, I can use my arrows to go around. But if you hold down the control key and hit your arrows, it’ll just jump quickly to the end. Parts of it. You can see right now, I’m holding down control. And as I use my arrows, it goes to all the different parts that quickly to the corners of it, to the ends.
So it’s just a quick way to manage your worksheet to get to a particular cell.
Tip 4 – Double click to quickly extend a cell
Here’s another important tip for you to know. Now, when you have certain column widths that aren’t wide enough, you could drag them. You could grab and drag and go through each one and drag till it fits, but you can just simply double click on that spot.
So if I go in between the column where the line is and double click, it automatically adjusts. So another thing is I’m just going to hit back a couple of times, get back this. If I select everything by going up to the top left-hand corner and just clicking and now I pick any one in between double click and then adjust all the rows to fit nicely on it.
Tip 5 – Use Autocomplete
If I was typing a list and I already had these email list here and if I went over to here and I just start typing the first name, and as soon as I go down to the next one and start typing notice, it starts to fill in my choices and fill in the rest of the column there because it recognized the pattern and how it did. First name, last name.
And all I have to do is hit enter at this point and it fills in the column based on the pattern that it was showing from the first cell. So that’s called Flash Bill. Now with Autofill, if we went to a different one, if I just put in the number like one, I could just simply click on this and drag it down like so and it just copies everything down. The other thing you can do, if I put in the number one here, if you just double click right on it and it automatically fills the column-based to the same size to the left of it there. But this can also recognize patterns.
So what I mean by this, if I put one in the first one and two in the next one and I highlight both like this and then drag them down, it will continue on with the pattern that I recognize because I highlighted the first two cells on this one.
This does work with other things like dates. So if I was typing in with months here, if I typed in January and then just simply double-clicked and it would fill in matching to the next column on this one, I could even put dates on this one. So if I was putting let’s put the year in right away, it’s going to recognize that that’s a date. And as it goes down, it’s just going to progress like that. So these are some great timesaving features just to quickly fill in cells when you’re inputting that data.
Tip 6 – Use Both Absolute and Relative references
Here’s a very important tip for you, if you’re new to excel, and that’s understanding the difference between a relative reference cell to an absolute.
So now in this case, I’m going to create a formula here, just giving it an amount to the quantity and cost here. And I’m going to copy it down.
I’m going to just put in equals this and I’m going to say multiply by the quantity and I’m going to get the amount. So this cell right here is a relative reference point here, because if I copy this down, you can see as I click through each one and look at the formula, how it changed. So now it’s five times C five and this was D four to see four.
So it’s changing as I copied it down is giving the correct formula. Now, if I wanted to apply in this case a discount to this, so I’m going to have this an equal as my formula and I’m going to have the amount and I’m going to say multiplied here by this 12 percent discount and I’m going to hit enter.
So this is correct. It would be two fifty-one on this one. But the issue arises if I copy this down like this, you can see I get all these mistakes here. Now what’s happening here? So if I click on this one and look at it E four times C one.
Well, that’s correct. But if I click on the next spot, it says E five times C two. Well, C two is right here. I needed to stay on that cell. So I need to say as an absolute on that one. So this is how you do that. So if I go back up to this one, I need to make sure I put a dollar sign in front of the letter.
But not only the letter, I need to put it in front of the number two to make that an absolute spot. So I need to stay in C one all the time. So now if I copy this down like this, I get all the correct ones because now if I click on it, you can see it.
Now the other one is changing to this, but I needed to make sure I had an absolute cell reference for that second part there. So that’s a very important tip. So to help you out when you’re creating your formulas to make sure you understand the difference between the relative reference and the absolute point.
Tip 7 – Transposition
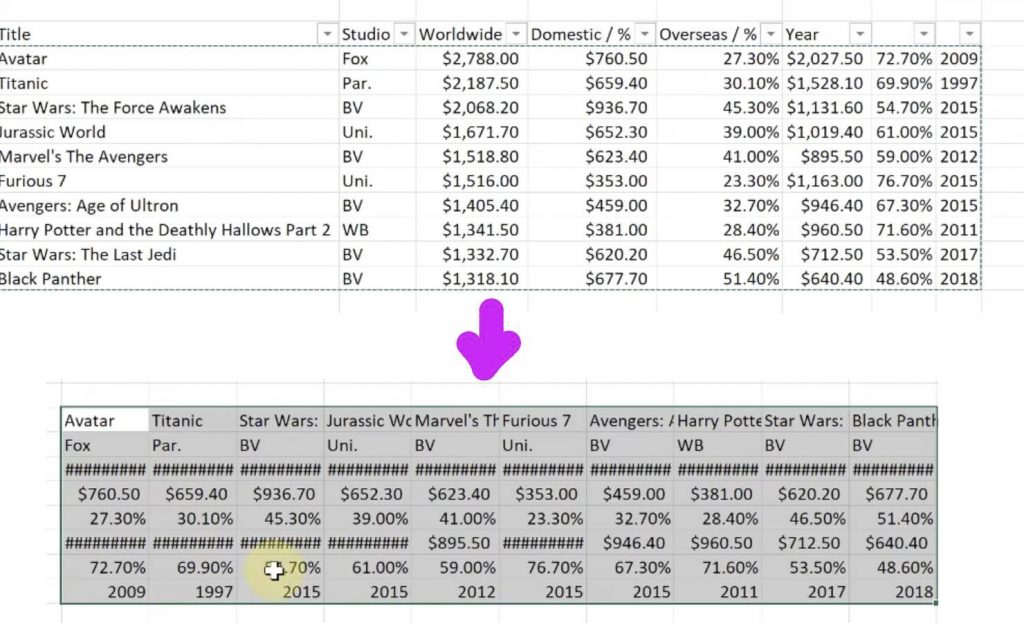
Let’s say you wanted to change rows with columns. So we’re going to transpose and I’m going to use this example of the movies here. We’re going to reverse our columns to Arrows.
So how do you do this? Here is I’m just going to go ahead and select my table like this and I’m going to copy. Right. Click copy. And I’m just going to move over and. Right. Click this time. Go to pay special. So I’m going to click special and there you go.
Right there you check, transpose and this will do the reversal and I paste it and you can see we have some formatting that doesn’t fit. But like I showed you before, to quickly highlight everything, double click. And now you can see it took the name of the movies that was in this column and went across as rose across. So that’s how you reverse it or transpose it very quickly.
Tip 8 – Use Text Columns
If you just wanted to change the look of your table that you have, let’s say you have a list typed out in, let’s say a word or maybe someone emailed something to you in a list and you want to put it into an Excel spreadsheet.
So here’s an example when I take this right here. So I’m just going to. Right. Click and copy this and go over and paste it into my worksheet over here. So when we paste it, it doesn’t separate it into different columns and a spreadsheet. That’s what I want.
So I can apply different formulas in different to different reference points inside the worksheet. So one thing we can do, and I have it highlighted right now is go up to data and then go ahead and pick text to column. So I’m going to go ahead and click on this here and now with this one I’m going to do is I’m going to leave it at delimited here.
So a character such as Commas and Tabs separated each field. So when I got this one, that’s how I had it separated is by commas. Now I’m going to go ahead and hit next. And what do I have it separated by with comma. So if you don’t have it selected already can select it. And you can see as soon as I pick comma, it separates it into the different one. So if it was separated by tab or semicolon, I would choose those.
So I’m going to go ahead and hit next and I’m going to hit finish on this one. I’m just going to go ahead and make the adjustment here. So now you have each of these in their own column and you can start applying maybe different formulas to this.
And this will save you a lot of time rather than having to go to each one and put it into a separate column on your worksheet.
Tip 9 – Inserting Screenshots
Let’s say you wanted to put some images into your worksheet, really simple way to do this is through screenshots. So I’m just going to go up to insert and I’m just going to use the worksheet that I have on right now. And you can see the screenshot is right here. So I’m going to go ahead and click on it and then I’m going to just click on the word document that I have open here that I showed you previously.
And it just took a snapshot of that. So the thing I can do to this, though, I can still edit this, I can go to it and crop if I wanted a certain part of it cropped so I can take the handles and move them in. And as soon as I click off, it makes the crop.
Now, what I like to do is sometimes when I use the screenshot is to select a certain area. So I’m going to go back to insert the screenshot. In this time, I’m going to go to screen clipping. So maybe now I have the website open. I just want to take this image, a screen rate of this. I’m going to select this area and let go. And now this is inside my document. So it’s a very quick way to get some images right inside to your worksheet.
So maybe you want to see where all the formulas are on your worksheet, so just at a glance, you just want to know with each cell where the formula is.
So a quick way to do this is to just click on the worksheet you’re on and then hold on control and press Tilde. So Tilde is right beside my number one key to the left. So when you hit, control that down and press tilde and you can see right away. Now I see all the formulas on a worksheet. T
The nice thing about this is I can just toggle it back and forth when I press it again, it goes back at any time. If you knew where the formula was, I could just simply double click on it and you can see where it’s going to be, that individual cell. But I really like that. Control tilt a feature to see all the cells where the formulas are at once.
So I hope you like these tips that they’re aimed more at the beginner.